When we first toured the house, I have to say the most promising room was the Kitchen. It swept us off of our feet with all of it’s possibilities. It was filled with light from it’s five windows and two skylights. The cathedral ceiling, the pretty little garden window over the sink and the view of the backyard allowed us to see that it had the the bones to be a really beautiful room. But it was definitely missing the final “bone”…
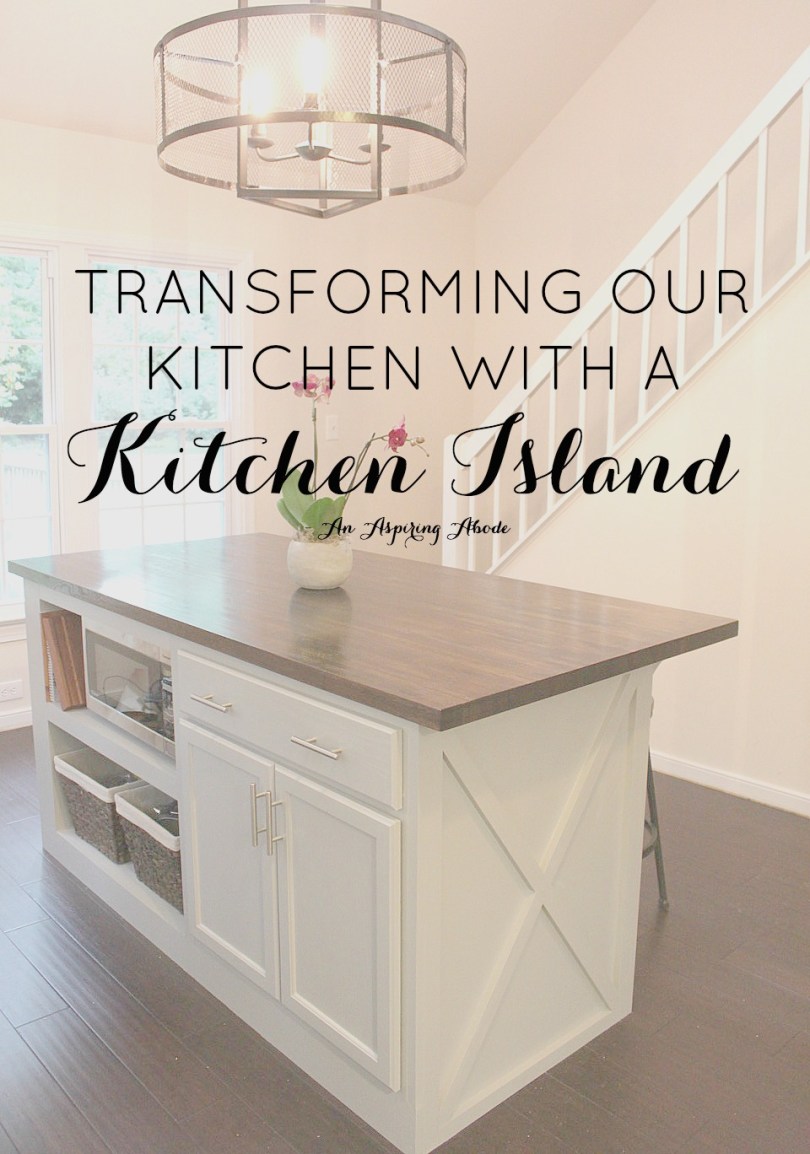
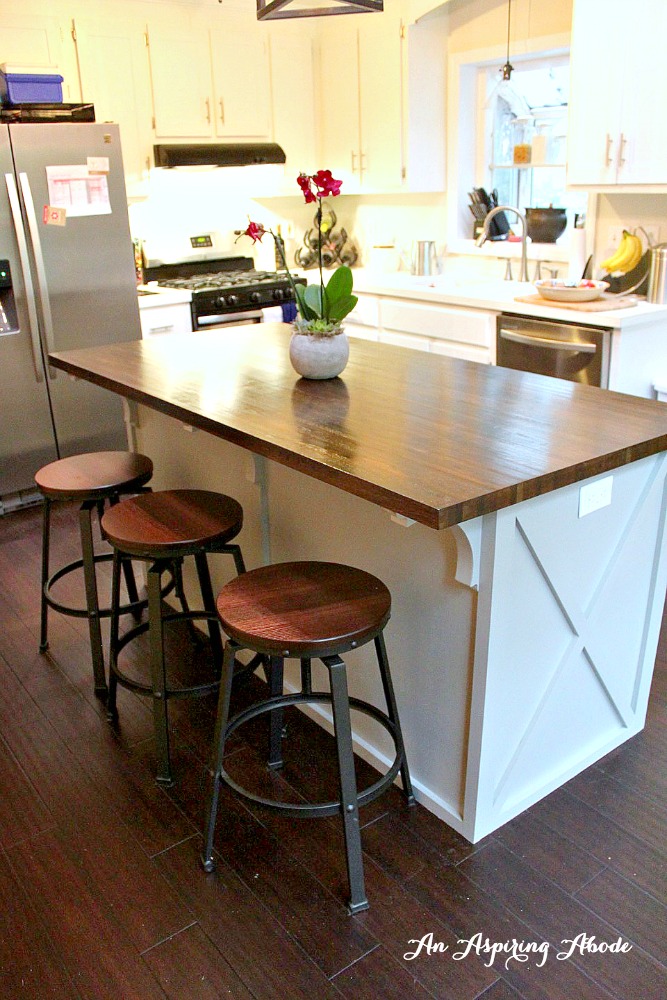
The room is pretty large and the cabinets only take up a small portion of that space. The entire middle and right side of the kitchen was completely empty. The realtors marketed this space as the eat-in portion of the kitchen. Meaning that it was meant for a dining or breakfast table. That’s definitely what it was being used for before. But we realized that we would probably want more cabinet storage and prep space so we knew we wanted to build a great big kitchen island that would provide those things for us.

This was the state of the kitchen when we toured it.
Things that an island would provide:
- More counter space – A lot of our counter space was in a corner where it’s not so easy to reach. Because we wanted the island to serve this purpose, we knew that it’d have to be counter height.
- More storage – While we have plenty of upper cabinets, we needed more space for small appliances, pots, pans and baking sheets. Because we have a gas range, we can’t store anything in the bottom because it’s a broiling drawer and that’s how the heat gets into the oven.
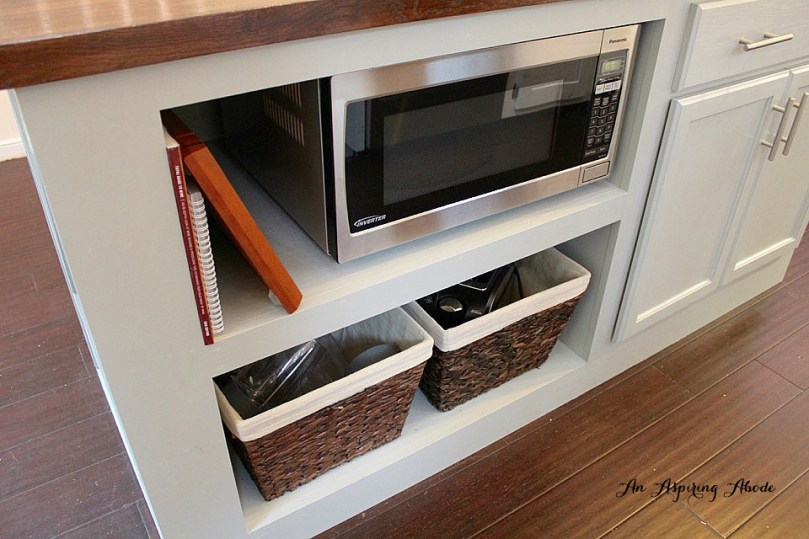
- Space for our microwave – Because of the size of the cabinet above the range, there is only has room for a vent hood and not a microwave. So, we wanted to free up some counter space by putting it in the island (and get that eye-sore out of sight!)
- A place to sit that wasn’t as formal as the dining room – If you think about it, people always congregate in kitchens when they come over (now that I’ve told you this, you’ll notice how much it actually happens). So having a great big island to stand and sit around was something that we really wanted. Plus who doesn’t like to eat breakfast and make some coffee in the kitchen in the morning.
Step One of Six: Sketch a layout
Goodman is great at this. He’s really mathematical, and really good at drawing. So he used some gridded paper to create a detailed plan with all of the dimensions and incorporated all of my asks into the plan.
We started off by measuring exactly how large we could make the island according to the kitchen dimensions and laid out some tape to be sure that we could both comfortably walk around it on all sides.
Once we knew how big it would be overall we started thinking about the features that we wanted the island to have. I wanted an overhang to put barstools under, two shelves – one for the microwave and cookbooks and the other for other miscellaneous things. Then a covered cabinet and drawer section to be able to store kitchen items.
We looked at the dimensions of pre-fab cabinets and decided on a medium sized cabinet (about 30″ – they range from 15 – 36 and then there are larger ones). Then we subtracted the width of the pre-fab cabinet from the width we wanted the island to take up and allocated the extra length for the shelves minus a couple of inches on both sides (for framing). Note: We ended up changing from this original sketch quite a bit.

Step Two of Six: Get your materials
After doing some research on material prices online, it looked like the wood materials were a little less expensive at The Home Depot than at Lowes so we went there to grab the items on our list.
We thought it was going to be hard to be able to find a butcher block top that would be the perfect size. BUT Floor and Decor happened to have a really pretty fumed butcher block available in exactly the right size (6ft by 3ft) – yay no cutting!
Step Three of Six: Build that Baby
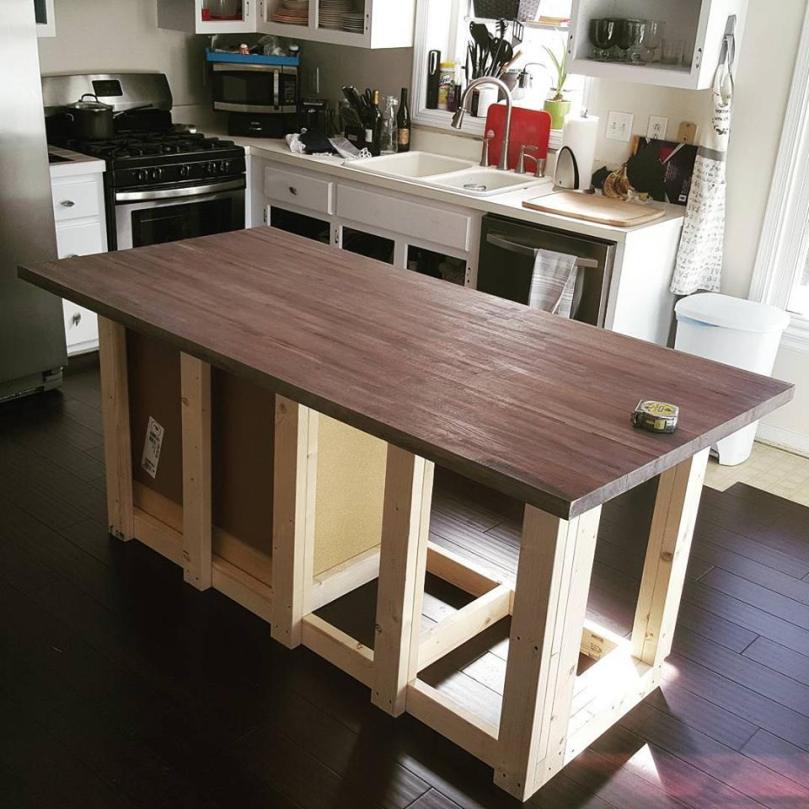
After that, G shot in the plywood and it was time to decide on the exterior design. I really liked the idea of making it feel modern barny. Not like purple dinosaur Barney but more like Joanna Gaines modern-barny.
So I looked to Pinterest for some inspo. I realized that barns have these big X’s on their front doors sometimes, and a lot of times you will see that X on a lot of things that are “rustic.”
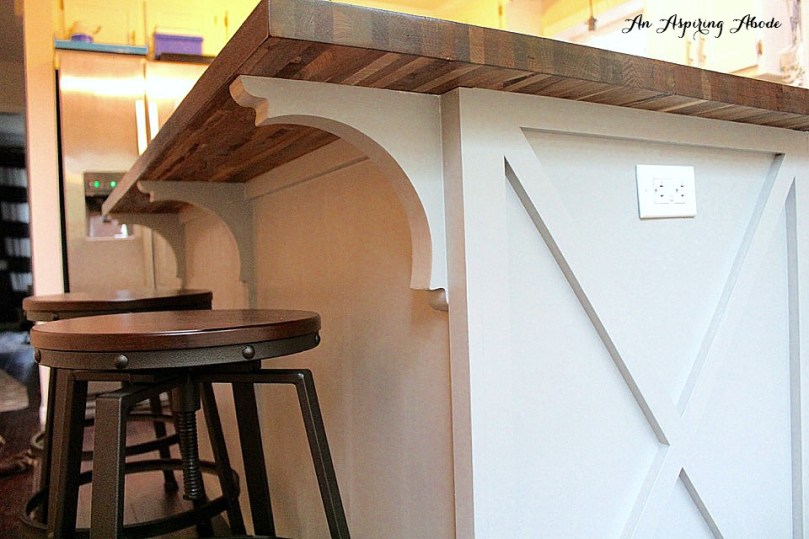
So I decided on X’s on the ends and a straight line through the middle of the spot that would have the barstools in front of it so that it wouldn’t look too busy. The corbels looked great with this design, too.
Goodman precisely cut all the trim pieces and, to make me feel useful, he let me use the nail gun to shoot them in. Here’s what it looked like when we were finished. (I’ll show pictures of the front later on in this post!)

Step Four of Six: Painting
I had a really rough time picking out the paint color. After the debacle with the living room and guest room paint colors (another blog post coming soon), I was scared to make another wrong choice. But I did anyway…
I was thinking that I wanted our main upper and lower cabinets to be an off white and then the island to be gray. But my dilemma was that I wanted the island to have enough contrast from the dark hardwood floors and butcher block. So I looked for a light gray. I settled on Agreeable Gray (Sherwin Williams) which was light but had some taupe undertones. I started painting it on (at night – with no light from the windows DON’T EVER DO THIS) and thought “Oh, it’s lighter than I thought it would be but I’m sure it will dry darker.” Nope. It was just slightly grayer than the Alabaster White (also Sherwin Williams) that I chose for the cabinets.
So back to Lowes I went. I then settled on a gray that was a few shades darker – Dorian Grey (you guessed it – Sherwin Williams) and waited until Saturday morning to paint it on in the light!
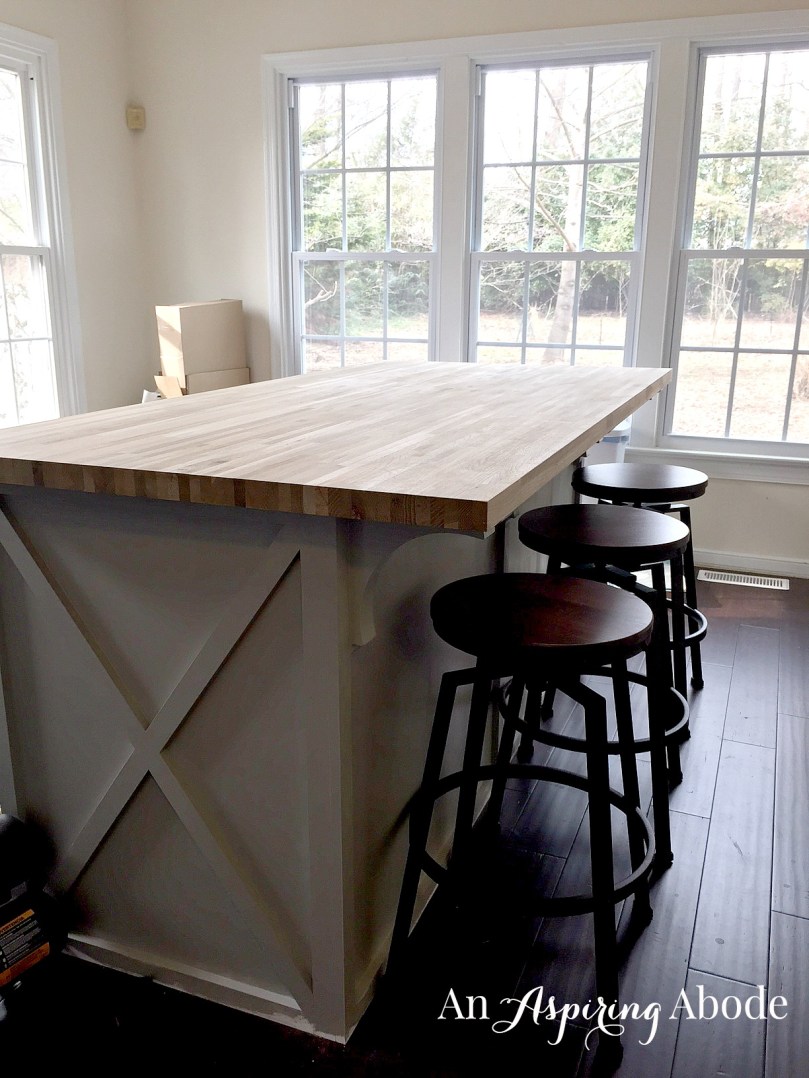
It worked! I still think that it could be darker but I like the drastic contrast that the grey creates with the floors. So I kept it.
Step Five of Six: Staining
After a couple of coats on the island face. It was time to “stain” the butcher block top. We were told that the only thing that you can do to a butcher block to keep it “food safe” was to use this beeswax stuff that basically moisturizes and seals the wood. But I REALLY wanted the color of the butcher block to compliment and go with the dark wood floors so that it didn’t feel like there was all of this different wood everywhere.
So we did some research and long story short, you CAN stain a butcher block and seal it with this WaterLox product and after 30 days its completely non-toxic. We don’t plan on using it to literally chop things on anyway but better to be safe than sorry.

After sealing the raw wood with 3 coats of the sealer, we then applied 3 coats of the stain and it matches our floors perfectly. Goodman thinks it’s a little too dark and may sand it down to lighten it up a little bit but I love it, so we are keeping it this dark for now.

Step Six of Six: Styling
I found these great baskets at Michaels, and Michaels always has a great sale (and coupons) so I got them for pretty cheap. $12 Each. I actually originally bought them for our laundry but they just fit really well here. They are perfect for storing the small appliances we use really frequently like our NutriBullet and toaster.

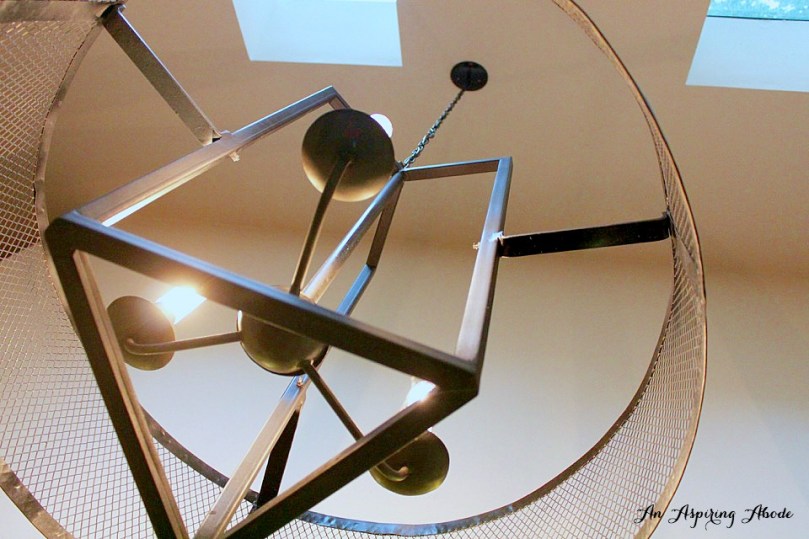
Then, we knew we wanted one big light above the island. I wanted something really unique because you can see it when you walk down the stairs due to the vaulted ceiling.
I found this one at a thrift store that I’ve written about previously, called Class and trash and bargained with them to get it for $65!!! Goodman had to do some magic electrically and with spray paint to get it to look like this but I think it was pretty close to what we were going for.

Then came the seating. I wanted the industrial look to counter balance the classic white. And, I love industrial with wood, which there is a lot of in this kitchen. The other thing was that, well, Goodman and I are kind of short (don’t make fun) but we have lots of tall friends and family, so I wanted adjustable stools. I found these stools at Target and thought they checked all of those boxes.
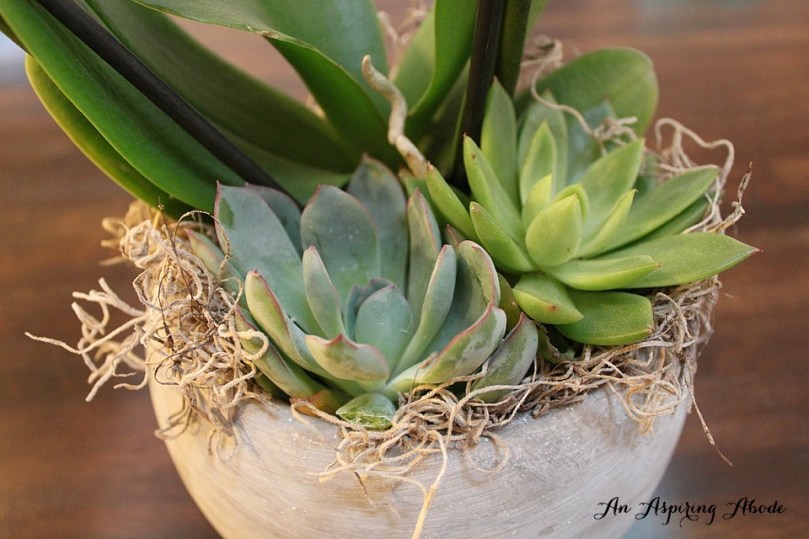
To top it off I wanted to add some flowers. But I wanted something that would stay alive for a while. I found this orchid that has succulents at the base and knew it would be perfect! Wouldn’t take up too much space and would require low maintenance.

Total Cost: Just about $1,000
Yes I know that sounds like a lot, but it TOTALLY transformed our kitchen with everything it needed: Storage, Counter Space, Seating, Focal Point.
Seriously anytime someone comes over they migrate there and we all stand around it and talk, it’s the best. Not to mention the ROI we think we will get on this project when we sell the house one day!
Materials for Island: Around $200, Pre-fab cabinet with drawer: $107 on sale, Butcher Block 6ft x 3ft Island Top: $390, Sherwin Williams Quart of Semi-Gloss Paint in Dorian Grey: $24, Waterlox Products: All three for $77, Target Bar Stools: $67 each, Michael’s Baskets were $12 each, Microwave: $170 from Wayfair, Orchid from Kroger: $15, Light and Materials: about $75, Pulls were left over from contractors pack we bought for the cabinets.