Projects Underway: April

So, I know it’s been a couple of weeks since a last published a post! I’ve planned to post something every week, BUT sometimes projects don’t go as planned and that messes up the schedule a little bit. Also, we have this problem with getting really excited about one project and putting the others on hold. Hopefully we can get a grip on that soon 🙂

I thought I’d give an update on where we are and what you can expect to see, soon! Here’s what we have going on right now:

PROJECT UNDERWAY: Back Deck Makeover

PU-Back-deck-makeover

  • This one got bumped up because I want it to be ready when the nice weather comes back!
  • We are fixing/replacing some boards on the deck and reinforcing the structure
  • Making an outdoor sectional sofa for around our fire pit
  • Painting/refinishing the deck “Cape Cod Gray”
  • Putting lights up
  • Replacing the back door

So, there’s quite a bit more to do out there than I originally expected, but like I said, I want this one done ASAP so I can soak up the sun with my pup.

PROJECT UNDERWAY: Kitchen Island

PU-Kitchen-island

  • We’ve been working on this one forever and are alllllllmost finished
  • We’ve already built the structure
  • Put in the electrical
  • Stained the butcher block top
  • Purchased the bar stools
  • Purchased the microwave
  • Still need to put the doors and shelves on/in
  • and paint them so that I can make the Kitchen Island blog post for you all!

PROJECT UNDERWAY: Front Door Refresh

PU-front-door-refresh

  • We started this one two weeks ago thinking  we could finish in two days.
  • Turns out, the previous owner really liked to repaint the front door – there were layers of black, red, purple, green, light green, and white that we ended up having to strip off.
  • We’re adding some greenery
  • Adding some fresh color
  • Changing up the door hardware
  • Adding new light figures
  • and some other unique touches to warm up the entrance
  • Stay tuned! Almost finished with this one, too.

Be sure to subscribe to the blog if you want to see the posts when they come out!

Redoing Kitchen Cabinets For Less Than $200

When we really started to use and take a close look at our cabinets we realized that they were really poorly repainted at some point. The people who painted them had used some sort of spray paint and didn’t take the time to do it correctly. You could tell from the drips on the face and sides of the cabinets and because of the fact that the hinges were completely painted over [you’re not supposed to do that!]

IMG_5028

We knew that we wanted to replace the quirky (also sort-of tacky) little leaf knobs that were on the cabinets with actual cabinet pulls anyway, so we made the decision to take them all down, sand off the drip marks, repaint and put back up with new hardware.

Sounds easy enough, right? Think again. This proved to be one of the longest projects for us to complete. Mostly because there are so many steps and you have to wait in-between most of them.

Step 1: Taking the cabinets down

First thing we had to do was get the cabinet doors off of the cabinets themselves. Because someone had painted over the hinges this was much harder than it should have been. We literally had to chisel the paint out of the screws and once we got the screws off we had to pry the hinges from the cabinets with knives. It was ridiculous. This is why you shouldn’t take shortcuts and do it the easy way!

Step 2: Cleaning them up

Then we had to chisel the hinges from the cabinet faces. This also took a bunch of time because we have 13 cabinet doors. 13 cabinets X 2 hinges each = 26 hinges to chisel. No bueno.

Then, because we were changing from knobs to pulls we had to fill the existing holes with wood filler. Then wait for that to dry.

Step 3: Sanding

Let me start by saying this – sand outside if you can. Dust will literally get in every spot that air touches if you don’t. For us it was really cold outside and we got impatient so we went ahead sanding in the sunroom thinking that it would just get dusty in there…HAHA. Dust. Got. Everywhere.

The next day we sanded the spots where we put the wood filler down by hand. I started to really look at the cabinets from the back and that’s when I had the greatest idea ever (if I do say so myself). I cabinet-holes
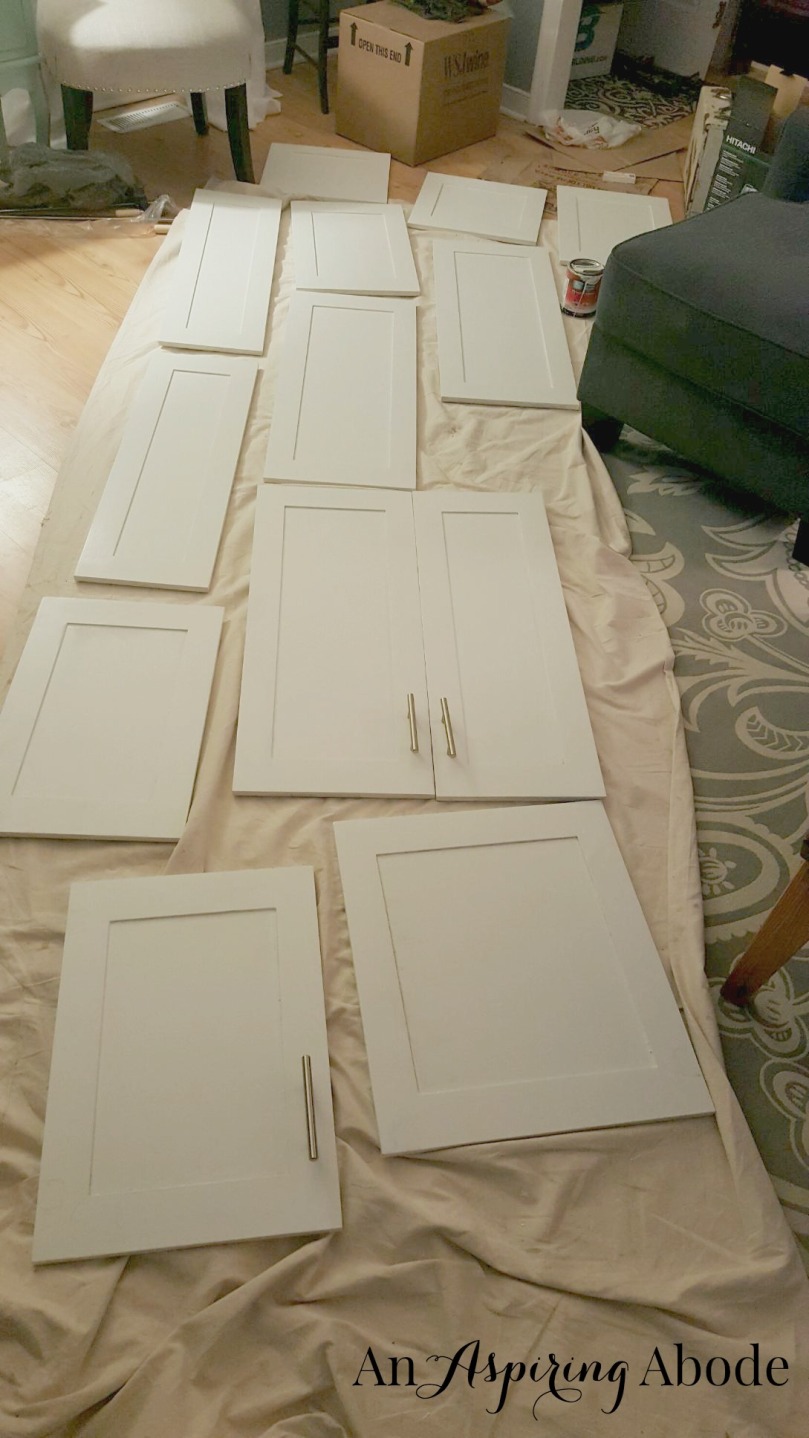
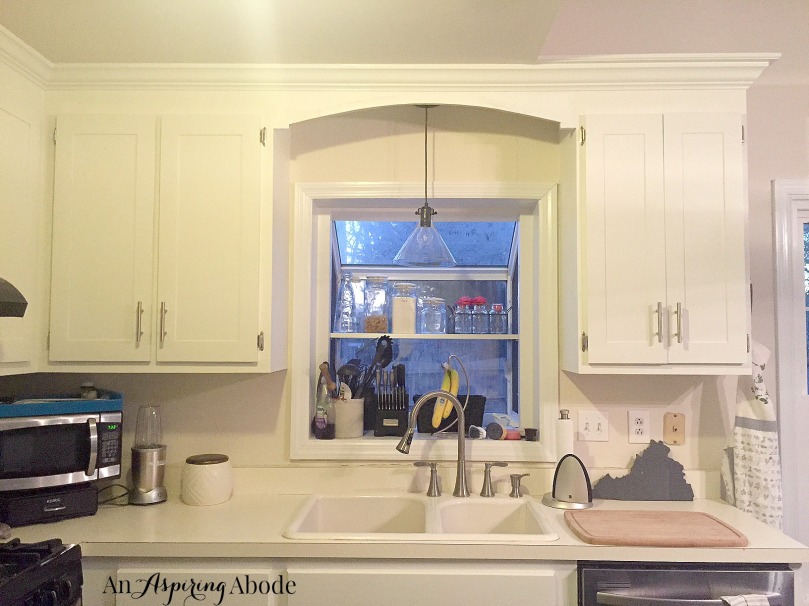
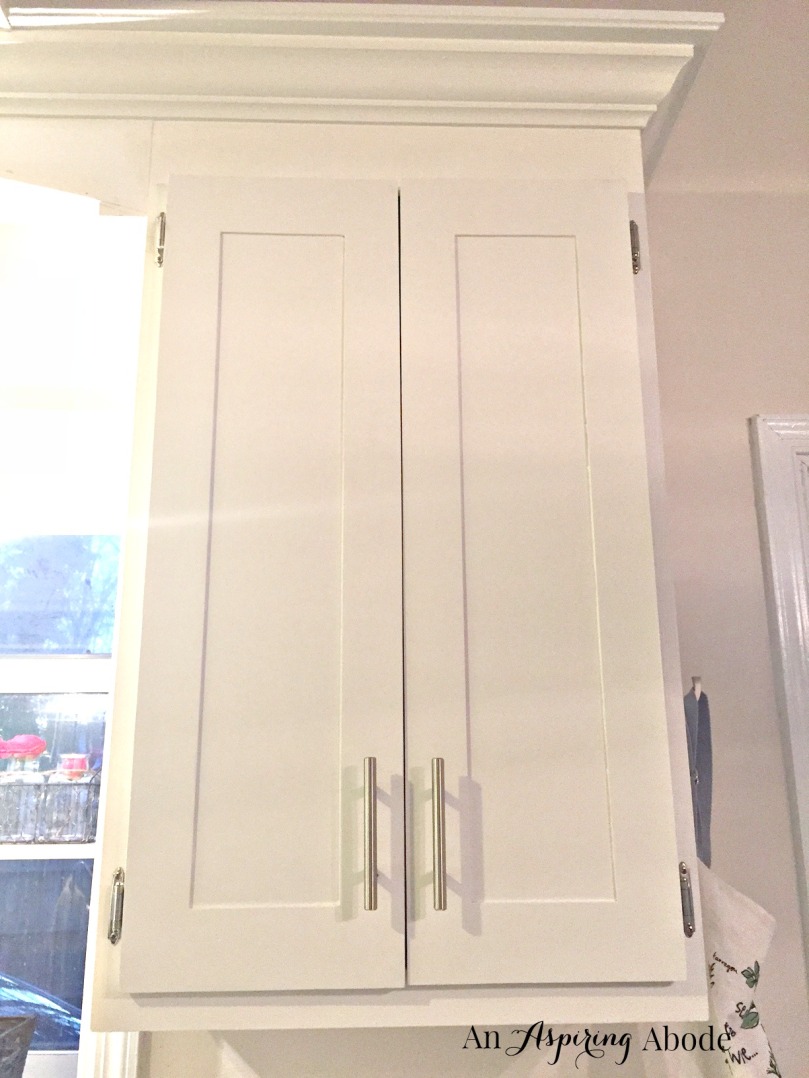
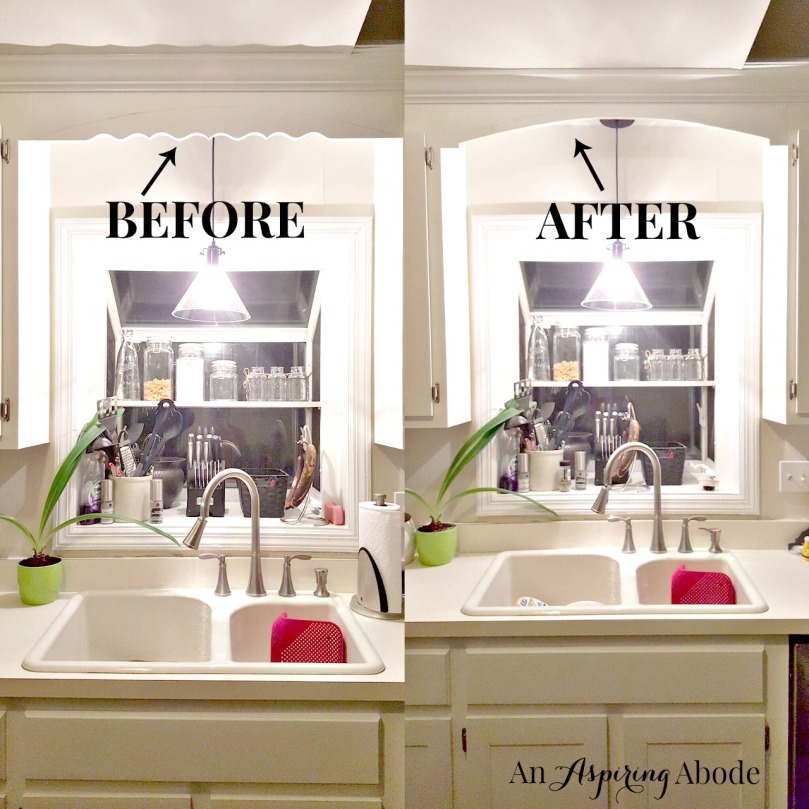
noticed that the inside of the cabinet doors were way prettier and more modern than the actual face of the cabinets. They looked just like modern shaker cabinets while the intentional side looked like cabinets from 1989 (because they were).

Because the hinges were not inset on that side we were able to make the decision to flip the cabinets inside out! I think this made the biggest difference….and it was completely free!

THEN knowing that we were going to flip them, we had to sand and fill all of the spots where the existing hinges attached to the inside of the cabinets. (See left)


Step 4: Painting

After that we also decided we wanted to change the paint color.We wanted it to look a little bit less like primer (bright white) and more like a creamy white color that would go well with the brown butcher block of the island. I chose Alabaster White by Sherwin Williams. It was not yellow, not gray, just a creamy milky white. This also meant that we now had to paint the cabinet bases so that they would match. So I painted all of the bases from top to bottom.

Then came the time to paint the actual doors. Let me just say that painting a cabinet door really stinks. You have to paint the whole bottom and little skinny sides and then wait for it to dry, flip it over and paint the other side. Then you have to do it again with the second coat. All 13 freakin’ doors. It was cold outside, so for the 2 days that it took me to do this our living room was filled with a huge drop cloth and cabinet doors. We had to constantly watch Wyatt to make sure paw print accents didn’t find their way onto them. 🙂

cabinets

Step 5: Install Hardware

LASTLY we put the hardware on. Goodman didn’t trust me to do this because the drilling had to be really precise so that the pulls would fit correctly and not be crooked or anything like that.

We put the hinges on first in this case because there were already holes in the base and we purchased the same kind of hinges so that we wouldn’t have to sand and fill and paint and all that on the base of the cabinets.

After putting the doors on the hinges we needed to put the actual pulls on. So, we measured how far from the bottom of the cabinet we wanted the pull to be and then added the distance from the end of the pull to where the screw goes in the pull at the bottom and marked that on every cabinet. After the hardware, we were done!

I’m going to take some better pictures and update the post but here are some pictures of the upper cabinets from my iPhone!

cabinets2

cabinets3

cabinet1

cabinets4

The last thing we did was cut the old wavy wood piece that was above the sink. Goodman thought it’d look good with a curve to match the curves on our appliances. I think it looks great!

cabinet-before-after

Overall I think the whole long process really was worth all of the steps and the time! What do you think?

P.S. We are ALMOST done with the kitchen!  We need to get new countertops, a backsplash, move the microwave into the island (when we finish the electric in the island) and we will be pretty much done! I’ll be doing a post about the island soon and then eventually one for the whole kitchen itself. Stay tuned 🙂


Total Cost

$174 plus the tools we had on hand. See details below:

Quart of Sherwin Williams Ovation Semi-Gloss Paint in Alabaster White: $24, 10-Pack 3-inch Center-to-Center Satin Nickel Bar Cabinet Pulls: $110,  Mini Foam Cabinet Roller: $5, 20 Double Pack Hinges found on Amazon: $35. On hand Materials: Wood Filler, Sander and Sandpaper, Drop Cloth, Angled Paint Brush.

How To Make a Butcher Block Cutting Board

For Valentines Day this year, my husband made me the best gift: a cutting board. At first I know that sounds a little random but hear me out.

Cutting boards are actually relatively easy to make (so I found out during this process and you can see in the “How To” at the end of this post). But this cutting board is actually super special to me. It is no ordinary cutting board. Let me explain.

A year ago when we were planning our wedding, I expressed my interest in old reclaimed wood to Goodman’s family. I knew that they were good at finding things like that and may have some spare wood that I could use to make wedding signage.

They did, and it wasn’t any ordinary reclaimed wood either. It was heart pine. (Don’t worry I didn’t know what heart pine was either, they explained it to me.)

Essentially Heart Pine is a type of wood that no longer exists/is endangered. The trees that it comes from – Long Leaf Pine –  pretty much covered the coastal planes of the united states after before the revolutionary war. Then, people built and built and built with the wood that they got from those trees and in no time there were only about 10,000 acres of them still standing. They didn’t realize that the trees wouldn’t grow back any time soon. It takes a Long Leaf Pine around 500 years to mature. So, long-story-short, this type of wood is highly coveted as it is no longer available anywhere and can really only be found in super old houses.

Lucky for me, Goodman’s Dad had renovated a house with this beautiful stuff and gifted a few planks of it to me to use as wedding signage.

Not only did I love that it had a back story (and was called heart pine) but I really couldn’t get over how beautiful the wood was. Because it takes so long to mature it has all of these really close together fine lines in it and looks gorgeous. You can see some of my DIY signs below!

heart-pine

Anyway back to the cutting board. The thing that makes the cutting board so special is that Goodman repurposed the signage with the repurposed Heart Pine to use as pieces for the cutting board! Now I can forever use these signs and have them on the kitchen counter every day as opposed to having them sit in the storage closet.

I thought it was the best gift ever. Good luck topping it next year, G 🙂

You can see the how to below!


Step One: Gather the Wood

To make sure that the cutting board will be able to sustain a knife actually cutting things on it, you need to make sure that you choose hard woods. Some hard woods are: Cherry, Walnut, and Oak.

You can find wood by searching for reclaimed wood warehouses, specialty woodworking stores and lumberyards that carry fine woods, just call around until you find something!


Step Two: Get the Materials

  • Sand Paper (120 grit and 220 grit)
  • Wood Glue
  • Hard Bristle Brush – Small
  • Large Piece of Cardboard (or other disposable material like our Trader Joe’s Bag)
  • 2 Rags
  • 2 Clamps (those big metal things)
  • Planer on hand
  • Rubber stoppers (optional)
  • Table Saw (optional – for the pretty beveled edges)
  • Butcher Block Conditioner (or you can just use mineral oil)

board-materials


Step Three: Cut and Plane the Wood

Cut the wood on a table saw to similar depths so that the cutting board will not have large variations in height that you’ll have to work hard to correct later. Do the same with the length.

Choose the pattern (if you are going to create a pattern with the different colors of wood) that you want and lay them out in the order that you want them to be put together.

Then plane the wood on two sides (the ones that  will be touching each other) so that the wood can join nice and tight with no irregular gaps in between.


Step Four: Glue and Clamp Together

Apply the glue on to the right side of the first piece of wood. Make sure to spread the glue evenly with a hard bristle brush. Sit that piece down onto the clamps then push the next piece of wood onto the glued side.

Then take the next piece of wood and apply the glue to the left side and stick it onto the other two that are already glued together. Continue this process until you have glued all of the pieces together.

Then tightly clamp all of them together. Be sure to align them if they start to slide up or down (Goodman calls this “walking”). You really have to use a lot of force to keep them all lined up like you see in the picture below. You can use something like a hammer or just put all of your body weight on them until you get them all lined up correctly.

Then wait until the next day before removing the clamps. It should then look like the picture below.

glue-board


Step Five: Sand and Finish

Sand sand sand. Start with a 120 grit sandpaper until it feels smooth to the touch. Then use 220 grit sandpaper (or higher) to make extra smooth.

Then use a wet rag to wipe the wood down. This brings the grain out of the wood so that you can more finely sand the board.  After it’s dry (or while its just a little bit damp) sand again with the 120 and then the 220 grit sandpaper again.

Use Butcher Block Conditioner (or mineral oil) and completely cover the board in the stuff with a rag. Wait at least an hour and apply another coat. You can do as many coats as you want but we liked the way it looked after four coats.

Last thing to do is to attach the little rubber feet to the bottom. The ones Goodman got from Lowes had little adhesive sticky’s on them so it was super easy.

And voila! You’ve got a very pretty cutting board and you made it yourself! You can see ours below!

cutting board

Total Cost: $59.50 plus tools and wood

Wood: free (We got all of the wood free from extra that Goodman’s Dad had), Wood glue: $5, Sand paper: $12, Hard Bristle Brush: $1, Clamps: $30, Butcher Block Conditioner: $9, Rubber Stoppers: $2.50, All other tools and materials we had on hand.